Fertilizer helps orchids develop healthy roots, leaves, and flowers, but repeated feeding can leave mineral residues inside the potting medium. Over time, these dissolved substances may accumulate around the roots and become concentrated as water evaporates.
This problem is known as fertilizer salt buildup. It is easy to overlook in the early stages because the first visible sign may be a thin white crust on the pot or growing medium. If the accumulation becomes severe, however, it can interfere with water absorption, damage root tips, and weaken the entire plant.
Recognizing the signs early helps prevent long-term root damage. It also helps orchid growers distinguish fertilizer residues from mineral deposits caused by hard water, which can look very similar.
1. What Is Fertilizer Salt Buildup?
Most water-soluble fertilizers contain mineral nutrients that dissolve in water before being absorbed by plant roots. These dissolved nutrients are commonly described as soluble salts.
When an orchid is watered or fertilized, some of these substances remain in the growing medium. As water is absorbed by the plant or evaporates, the remaining minerals can become more concentrated.
The process may happen repeatedly, particularly when fertilizer is applied frequently, the solution is too strong, or the potting medium receives insufficient flushing.
Salt buildup can come from two main sources:
- Fertilizer residues: Minerals left behind after repeated applications of soluble fertilizer.
- Water minerals: Dissolved substances naturally present in tap water, well water, or other water sources.
These sources can contribute to the same visible problem. A white crust does not necessarily mean that fertilizer has been applied incorrectly. Water quality must also be considered.
The University of Maryland Extension explains that mineral and fertilizer deposits can form white crusts on growing media and containers. Both types of deposits may interfere with plant health when they accumulate excessively.
2. What Does Salt Buildup Look Like?
Salt deposits can appear in several places around an orchid pot. Their appearance depends on the water source, fertilizer formulation, growing medium, and watering routine.
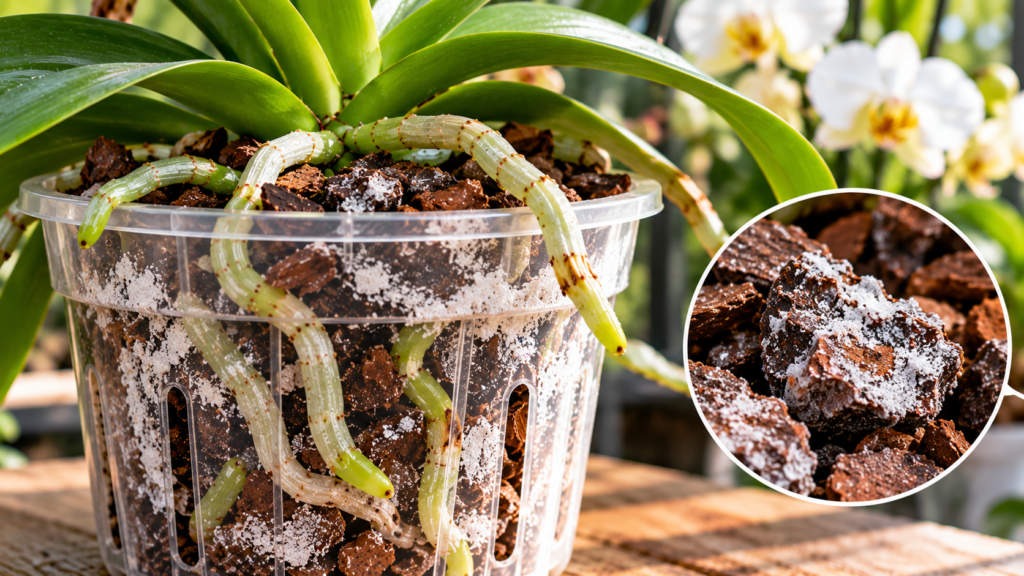
White crust on the potting medium
One of the most recognizable signs is a white or pale gray crust on the surface of the growing medium.
It may appear as:
- Powdery white material between bark pieces
- Crusty deposits around the surface of sphagnum moss
- Pale mineral residue near the edge of the pot
- Crystalline patches on exposed growing medium
The deposits may become more noticeable after the medium dries.
White deposits around the pot
Minerals can also collect along the rim, drainage holes, and exterior of the container.
Clay pots are particularly prone to visible deposits because water can evaporate through their porous walls, leaving dissolved minerals behind.
Transparent plastic orchid pots may show residue around drainage openings or on the inside surface.
Deposits on mounted orchids
Mounted orchids are not immune to salt accumulation. Minerals can collect on the mounting material, around exposed roots, and on surfaces where fertilizer solution repeatedly dries.
Because mounted orchids are frequently watered, the amount of flushing they receive can influence how much residue remains.
Brown or whitish residue
Not all deposits look perfectly white. Depending on the minerals in the water and fertilizer, residues may appear pale brown, tan, or grayish.
Color alone is not a reliable way to identify the source. Look at the location of the deposits and examine the roots and leaves as well.
3. How Salt Buildup Affects Orchid Roots
The most serious consequences often develop below the surface, where the deposits are less visible.
High concentrations of soluble salts can make it harder for roots to absorb water. When the concentration around the roots becomes excessive, water movement into root tissues can be disrupted. This can cause dehydration and tissue damage even when the potting medium appears moist.
Watch for these root symptoms:
- Black or dark brown root tips
- Root tips that stop growing
- Damaged or deteriorating root surfaces
- Reduced production of new roots
- Roots that become unhealthy where they contact accumulated deposits
The New York Botanical Garden’s Phalaenopsis care guidance notes that healthy roots with black tips may indicate fertilizer salt accumulation or inconsistent watering. It recommends regular flushing of the growing medium.
Do not assume that every brown or black root is caused by salt. Root rot, old roots, physical damage, and poor aeration can produce similar symptoms.
For a closer look at damaged root symptoms and their possible causes, see How to Recognize Fertilizer Burn on Orchid Roots and Leaves.
4. Leaf Symptoms That May Indicate Salt Damage
As root function declines, symptoms may become visible on the leaves.
Common warning signs include:
- Brown or black leaf tips
- Dry, damaged leaf margins
- Yellowing leaves
- Reduced growth
- Wilting or loss of leaf firmness
- Premature dropping of older leaves
These symptoms are not exclusive to fertilizer salt buildup. Underwatering, root rot, excessive sunlight, temperature stress, and other problems can cause similar changes.
The Iowa State University Extension guide on diagnosing indoor orchid problems identifies brown or dead root and leaf tips, yellowing, and salt accumulation on containers as possible signs of fertilizer burn.
The important point is to examine the entire plant rather than treating a single symptom as a definite diagnosis.
5. Fertilizer Salt Buildup vs. Hard Water Deposits
One of the most common diagnostic mistakes is assuming that every white deposit comes from fertilizer.
Minerals naturally present in water can leave similar residues. Hard water often contains dissolved calcium and magnesium, while other water sources may contain different minerals.
In practice, the two sources can occur together. An orchid watered with mineral-rich tap water and regularly fed with soluble fertilizer may accumulate residues from both.
If deposits keep returning despite reducing fertilizer, investigate the water source rather than continuing to reduce nutrients without evidence.
The University of Maryland Extension’s guide to mineral and fertilizer salt deposits on indoor plants explains the difference between these sources and recommends improving water quality and flushing the growing medium.
6. What Causes Salt Buildup in Orchid Pots?
Several growing practices can increase the risk.
Applying fertilizer too frequently
Repeated fertilizer applications leave more dissolved minerals in the pot. If the medium is not flushed regularly, residues can accumulate.
The appropriate schedule depends on the orchid, fertilizer concentration, growing conditions, and water quality. A routine that works for one collection may be excessive for another.
Using fertilizer that is too concentrated
Applying a stronger solution than necessary increases the amount of dissolved fertilizer entering the root zone.
Follow the product instructions and adjust the concentration to the plant’s growth conditions. Choosing a suitable formula is only part of the process; correct dilution and application matter just as much.
See What Is the Best Fertilizer for Orchids? for guidance on fertilizer types and NPK formulas.
Watering without enough drainage
Orchid pots need drainage. If water remains trapped in the container, dissolved minerals may become concentrated in the growing medium.
Avoid leaving pots standing in fertilizer runoff. Empty saucers and cachepots after watering.
Repeatedly adding small amounts of water
Light watering may wet only part of the medium without adequately carrying dissolved residues out of the pot.
Orchids need a watering routine that thoroughly wets the medium when watering is due and allows excess water to drain freely.
Using mineral-rich or softened water
Water quality matters. Some well water and hard tap water contain substantial dissolved minerals. Sodium-based water softeners can also introduce sodium into the water, making softened water unsuitable for many plants.
If deposits repeatedly appear, consider testing the water or using a lower-mineral source such as rainwater or reverse-osmosis water.
7. How to Remove Fertilizer Salt Buildup
If the deposits are light and the orchid is otherwise healthy, flushing the potting medium is often an appropriate first step.
Step 1: Prepare clean water
Use clean water without fertilizer. Rainwater or suitable low-mineral water can help reduce additional mineral input.
Room-temperature water is a practical choice.
Step 2: Flush the growing medium thoroughly
Place the orchid where excess water can drain freely.
Slowly pour clean water over the medium, allowing it to pass through the pot and exit through the drainage holes. The objective is to dissolve and carry away accumulated soluble residues rather than simply wetting the surface.
Do not allow the pot to sit in the drained water.
Step 3: Check the drainage
Make sure water flows freely through the container.
If the pot drains poorly, inspect the drainage openings and the condition of the medium. A compacted or decomposed medium may need replacement rather than repeated flushing.
Step 4: Inspect the roots
If the plant shows damaged root tips, poor growth, or persistent leaf symptoms, inspect the root system.
Healthy Phalaenopsis roots are generally firm, while dead or rotting roots may be soft, hollow, or deteriorating. Root color alone is not enough to diagnose a problem because healthy roots can appear different depending on moisture and growing conditions.
Step 5: Decide whether repotting is necessary
Flushing may be insufficient when the medium contains heavy deposits, has broken down, or no longer drains properly.
In that situation, remove the old medium and repot the orchid using an appropriate fresh mix. Remove dead roots with clean, sterilized tools.
For a more detailed flushing procedure and guidance on when rinsing is not enough, see Should You Flush Orchid Potting Media to Remove Fertilizer Salts?.
8. How to Prevent Salt Buildup
Preventing excessive accumulation is easier than recovering an orchid with damaged roots.
Use fertilizer at an appropriate concentration
Do not assume that stronger fertilizer produces faster growth or more flowers. Use the product according to its instructions and consider the orchid’s growth stage and growing conditions.
Water thoroughly when watering is due
Allow water to pass through the medium and drain freely. Avoid repeatedly adding only small amounts that do not rinse the root zone.
Flush the medium periodically
Regular flushing helps remove soluble residues before they reach damaging concentrations.
The American Orchid Society discusses monthly flushing as one approach to reducing mineral salt accumulation. The exact interval should be adjusted for water quality, fertilizer use, medium, and growing conditions rather than treated as a universal rule.
Choose a suitable water source
If your tap water leaves heavy mineral deposits, consider rainwater, reverse-osmosis water, or another suitable low-mineral source.
Avoid sodium-softened water.
Replace deteriorated potting medium
Old bark and other decomposed materials may retain moisture differently and restrict airflow. Repot when the medium breaks down or no longer supports healthy root conditions.
Adjust feeding to plant growth
An orchid that is actively producing roots and leaves may use nutrients differently from one that is resting or recovering. Fertilizer frequency should reflect actual growth rather than follow an unchanging calendar.
9. Frequently Asked Questions
Is white crust on orchid bark always fertilizer buildup?
No. It may be caused by fertilizer residues, minerals in the water, or a combination of both. Water quality and fertilizer history should both be considered.
Can fertilizer salt buildup kill an orchid?
Severe accumulation can damage roots and interfere with water uptake. If the damage continues, the plant may decline substantially and can eventually die.
Should I stop fertilizing when I see white deposits?
Do not continue applying fertilizer at the same rate without investigating the problem. First assess the deposits, water quality, root condition, and drainage. A temporary pause while flushing and evaluating the plant may be appropriate.
How often should I flush orchid pots?
There is no single schedule that suits every orchid. Monthly flushing is a commonly recommended approach, but the interval depends on fertilizer use, water mineral content, potting medium, and watering practices.
Can I use tap water to flush orchid pots?
It depends on the mineral content of your tap water. If it is very hard or leaves substantial deposits, repeated flushing with the same water may not remove the underlying source of the problem. A lower-mineral water source may be more appropriate.
Should I repot an orchid if I see salt deposits?
Not necessarily. Light deposits on otherwise healthy plants may be managed by flushing. Repot when deposits are severe, roots are significantly damaged, drainage is poor, or the medium has deteriorated.
Conclusion
Fertilizer salt buildup often begins as a white or pale crust on orchid potting medium, containers, or mounting materials. As dissolved minerals accumulate, they can interfere with root water uptake and contribute to damaged root tips, brown leaf tips, reduced growth, and declining plant health.
However, visible deposits do not automatically mean that an orchid has been overfertilized. Minerals in the water can produce similar symptoms, so diagnosing the source is essential.
Use an appropriate fertilizer concentration, water thoroughly when needed, ensure good drainage, and flush the medium periodically. If deposits are severe or the growing medium has deteriorated, repotting may be necessary.
Build your orchid care knowledge with The Orchid Care Guide: 200 Essential Orchid Care Posters, a planned collection of printable A5 visual guides covering practical orchid care topics explored throughout this blog.
Share this article